
Nesting Azure Stack Development Kit on a VM (ASDK)
This is the post on my new blog started 2020, I wasn't sure what to blog about, so I referred to my most recent project which was testing Azure Stack Development Kit. I don’t have the hardware in a lab to run it, so I was forced to nest ASDK on a VM. I searched & reference a lot of websites/blogs & had to alter more than what was suggested. Some of these references got me 50%-60% of way but I had to scrub logs and resolve issues one at a time and then rerun the installer.
This is the post on my new blog started 2020, I wasn't sure what to blog about, so I referred to my most recent project which was testing Azure Stack Development Kit. I don’t have the hardware in a lab to run it, so I was forced to nest ASDK on a VM. I searched & reference a lot of websites/blogs & had to alter more than what was suggested. Some of these references got me 50%-60% of way but I had to scrub logs and resolve issues one at a time and then rerun the installer.
So, I’m consolidating that all into this one post
hopefully making this a much simpler process, with new versions of ASDK installer
files being uploaded & different hypervisors being used this could work
100% or get you most of the way.
What i will show is how to check the installer log
which will reference the errors on script that you can either # out or edit to
satisfy prerequisites.
So, first thing first Prerequisites:
So, first thing first Prerequisites:
Here are the Hardware requirements that we
obviously can’t meet hence the requirement to Nest this setup. We will edit the
Prerequisite check script fool the installer to accept virtual Hardware
assigned to the VM.
Hardware
Component
|
Minimum
|
Recommended
|
Disk
drives: Operating System
|
1 operating
system disk with minimum of 200 GB available for system partition (SSD or
HDD).
|
1 OS
disk with minimum of 200 GB available for system partition (SSD or HDD).
|
Disk
drives: General development kit data*
|
4
disks. Each disk provides a minimum of 240 GB of capacity (SSD or HDD). All
available disks are used.
|
4
disks. Each disk provides a minimum of 400 GB of capacity (SSD or HDD). All
available disks are used.
|
Compute:
CPU
|
Dual-Socket:
16 Physical Cores (total).
|
Dual-Socket:
20 Physical Cores (total).
|
Compute:
Memory
|
192-GB
RAM.
|
256-GB
RAM.
|
Compute:
BIOS
|
Hyper-V
Enabled (with SLAT support).
|
Hyper-V
Enabled (with SLAT support).
|
Network:
NIC
|
Windows
Server 2012 R2 Certification. No specialized features required.
|
Windows
Server 2012 R2 Certification. No specialized features required.
|
HW logo
certification
|
To save you some struggle if you allocate to little compute memory (I started at 32GB, then 64GB, then 80GB with a Large page file in win Os to bring this up to 96GB Ram)
This is
still better than 192GB.
The
installer can run initially with minimal RAM but later in the installation the
when it creates and powers on the 13 infrastructure VMs it needs ( List of the
VMs Here ), your installation will stall as the
VMs wont boot with Hyper V Error:
“Not
Enough Memory in system to start Virtual Machine”
So,
use your Initiative here, Try and allocate as much as possible that you can grab
your hands on for your VM, your installation will be faster and GUI on ASDK
portal experience will be better.
Second
let’s Prepare the VM (ASDK Host Preparation):
Create the VM on your choice of Hypervisor, address the compute requirements as discussed above (I used Vmware ESX)
Create the VM on your choice of Hypervisor, address the compute requirements as discussed above (I used Vmware ESX)
- Create 4/5 Virtual disks
" Make sure emulate SATA Hardware ( recommended )"
See Link for supported Media types Here
- OS Disk(200GB) “Installer will extract a VHD file onto this volume”
- 3 or 4 Disks “for storage spaces direct (SD2) (Minimum of 80GB)
- Download AzureStackDevelopmentKit.exe
self-extractor approximately 10GB
Here.
- Download ASDK Installer
PS1 script here from Github repo
Here.
- Run AzureStackDevelopmentKit.exe self-extractor this will extract CloudBuilder.vhdx file approximately 28GB.
- Move CloudBuilder.vhdx to root of C: volume
Next
before we can run the installer PS1 Script we need to edit some of the
prerequisite checks it will do on our ASDK Host VM.
Use
either Notepad++ found Here Or PowerShell ISE install
as follows:
Edit ASDK-Installer.PS1
On Line
1917 remove 'Not Virtual Disk' replace with 'Not Disk'.
At this
point we need to edit a few files in the Cloudbuilder.vhdx file so when
the ASDK host VM reboots into cloudbuilder.vhdx file the installion will
continue without failure.
Find the Cloudbuilder.vhdx
file on the root of the C: drive , Right Click and Mount.
Browse
your new volume to file X:/CloudDeployment/NuGetStore/Microsoft.AzureStack.Solution.Deploy.CloudDeployment.1.0.598.8.nupkg
Copy this file and Rename original to .OLD
Rename
the copied file extension from .NUPKG to .ZIP
Browse
this file after renaming it to .ZIP & Alter 2 more files
- X:/content/Roles/PhysicalMachines/Tests/BareMetal.Tests.ps1
- X:/content/Configuration/Roles/Infrastructure/BareMetal/OneNodeRole.xml
BareMetal.Test.PS1
will validate if the ASDK host is Physical or Virtual again.
Edit
in Notepad++ , use Find Next to find "if (-not
$isVirtualizedDeployment)"
Change
all traces to "if ($isVirtualizedDeployment)"
Here is a
Link to the edited BareMetal.Tests.ps1 on Github
Next we
need to Change OneNodeRole.xml Validation requirements
Change CPU
, Memory & Disk Size Minimums: below example of my edit.
X:/content/Configuration/Roles/Fabric/BareMetal/OneNodeRole.xml
Here is a
Link to the edited OneNodeRole.xml for Fabric on Github
Once that is complete Or if you copied my Edited files into the zip..
Microsoft.AzureStack.Solution.Deploy.CloudDeployment.1.0.598.8.zip
Rename
this file back to :
Microsoft.AzureStack.Solution.Deploy.CloudDeployment.1.0.598.8.nupkg
- Copy the file back to X:/CloudDeployment/NuGetStore
- Unmount The Cloudbuilder.vhdx file
- Open Powershell & Run the asdk-installer.ps1
- <drive letter>\AzureStack_Installer\asdk-installer.ps1
Which
will then bring you to this GUI

Continue
with the MS wizard which will ask you a series of values & parameters
needed to do the installation.
The
deployment will take a few hours & will automatically reboot into the
CloudBuilder.Vhdx OS.
Login with azurestack\AzureStackAdmin same OS password.
The
deployment will automatically open up powershell and resume the deployment this
will run for several hours.
If it
doesn't run automatically run the following Powershell command elevated.
If your
install fails at any point Use the -rerun parameter.
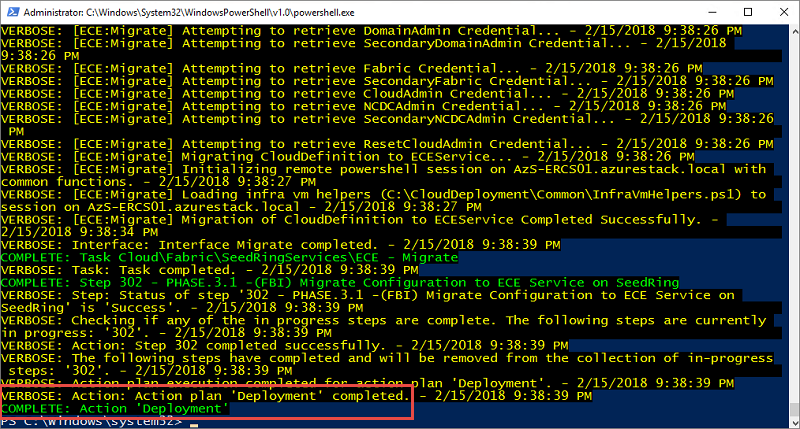
Through this i was able to edit Scripts after error and then rerun , trial and error until it succeeded with a 6 hour installation.
The above
example error was due to a service not starting automatically after a automated
reboot during deployment setup. Starting the service and then using the
-Rerun deployment resumed.
With the
edited files ive shared via links to Github you should be able to achieve
complete installation without error.
Here again with the links:
edited asdk-installer.PS1
edited BareMetal.Tests.ps1
edited OneNodeRole.xml for Infrastructure
edited OneNodeRole.xml for Fabric
At this
point you need to then register your ASDK deployment
Follow the steps here provided by Microsoft very straight forward.
Follow the steps here provided by Microsoft very straight forward.
Sign into
you Azure portal by typing the following address into the Browser on the ASDK
Host VM
https://adminportal.local.azurestack.external

https://adminportal.local.azurestack.external
If you struggling to open the portal you can Validate your Azure stack system state by running a tool through Privileged end point (PEP)

Lastly i
setup VPN to my AZURE stack VM so that i can access my admin portal in my LAB
VM off my laptop rather than using RDP or a Console client.
Before setting up a VPN connection to the ASDK, ensure you've met the following prerequisites:
Install Azure Stack-compatible Azure PowerShell on
your local computer.
Download
the tools required to work with Azure Stack.
You should then have a VPN connection on completion under your network connections that will allow once connected to use your local browser to access ASDK portal .
I hope this Post is of some help , please leave me a comment if you find error or if post requires update.
Thanks for Reading....
Comments
Post a Comment
Leave your Thoughts & Comments , and I'll reply as soon as possible.
Thank you for you views in Advance.